Offline Storage Table (OST) file is the local cache that Outlook creates when you add or sign in using an IMAP, Microsoft 365, Exchange, or Outlook.com email account. It is a database format used by Outlook to store a synchronized copy of all your mail items, such as emails, contacts, attachments, etc. on the local storage.
When a user account is either removed or deleted from the server, the linked OST file enters the orphaned stage and becomes inaccessible. Similarly, if the on-premises Exchange Server crashes or fails, the OST files of users become inaccessible. If they open Outlook, they may encounter an error message, preventing them from accessing the mail items.
If you have encountered such a situation where the hosted on-premises Exchange Server has failed or is unavailable, you can export the mail items of users from their inaccessible or orphaned OST files to Microsoft 365 or Microsoft 365 tenant and restore their emails. This is recommended when you don’t have access to the EDB files. The recent Hostage Exchange Server outage is one example where the users didn’t have access to the Exchange EDB files on cloud servers and they restored mail items from the OST file.
How to Migrate OST to Office 365 or Microsoft 365?
If your users are able to access their Outlook, you can ask them to export all their mail items from the linked OST file to PST format using the Outlook Import Export wizard. Then, you can import these PST files into Microsoft 365 using Network Upload or Drive Shipping method.
The steps to export OST file items to PST are as follows:
- In your Outlook 2013 or later, go to File > Info > Open & Export > Import/Export.
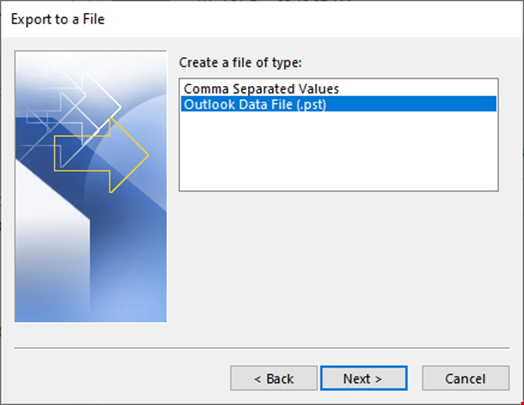
- Select Export to a file and click Next.
- Choose Outlook Data File (.pst) and click Next.
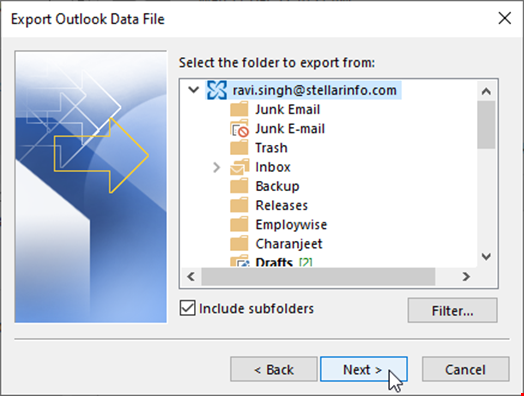
- Select your email profile and click Next.
- Click ‘Browse’ to choose a location where you want to save the exported PST file and click Finish.
- Do not enter any password. Click OK. This will export all the mail items stored in the linked OST file to PST format.
Note: There’s no manual way to fix or restore an orphaned or inaccessible OST file. The only way is to convert such inaccessible OST files into PST format using an OST to PST converter software.
Once exported or converted, you may follow the Network Upload or Drive Shipping method to upload PST files and import the mail items into the users’ accounts on Microsoft 365.
Follow these steps to use the Network Upload method for importing the converted PST files into Microsoft 365 mailboxes.
Step 1: Create User Accounts and Assign Licenses
After setting up the Microsoft 365 tenant, create user accounts for all the users that you need to migrate to Microsoft 365. Also, assign the licenses to each user to allocate a mailbox.
Step 2: Create a PST Import Job
Go to the https://compliance.microsoft.com/ page and sign into your Microsoft tenant. Then navigate to Data lifecycle management > Microsoft 365 > Microsoft 365 > Import and create a new PST import job using the +New import job button.
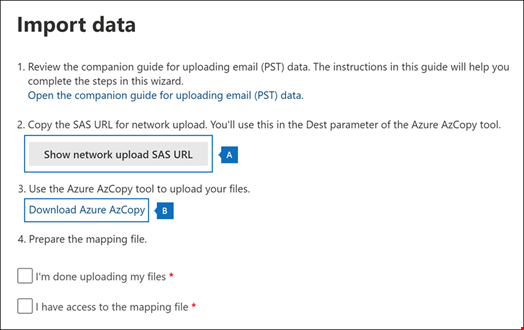
Step 3: Upload PST to Azure Blob Storage
After creating a PST import job in Microsoft 365 compliance center, you will get a SAS URL and an option to download the Azure AzCopy tool.
Move all PST files to a folder and then use the Command Prompt to upload all the PST files in the folder to Azure Storage. You need to navigate to the location where Azure AzCopy.exe is stored and then run the following command.
Azcopy copy “pathToFolder/ContainingPSTs” “SAS URL” --recursive=true
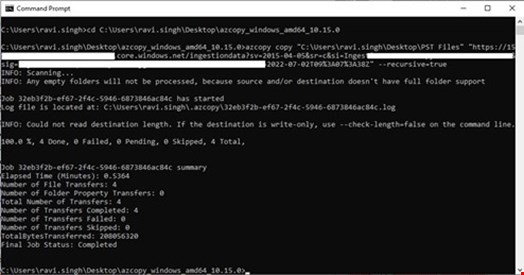
This will upload the PST files from the folder to Azure Blob Storage.
You can check if PSTs are uploaded to Azure Blob Storage using the Azure Storage Explorer tool.
Step 4: Upload PST to Mailbox Mapping (CSV) File
Next, download the sample CSV mailbox mapping file and then edit the PST file and mailbox names. You must enter the ‘FilePath’, ‘Name’, ‘Mailbox’, and ‘TargetRootFolder’ fields in the CSV file. Click Next and upload the CSV mapping file.

Clicking ‘Next’ will validate the uploaded PST file. If errors are found, check the CSV file and upload it again.
Step 5: Start PST Import Job
Once the CSV is uploaded and validated, you can submit and start the PST import job. To check the import progress, you can go to the Information Governance page.

Users can restart Outlook after some time to check if their mailboxes are updated. Once the process is finished, check for the errors and troubleshoot them to ensure all mail items are imported.
Note: You can’t upload or import PST files larger than 20 GB or emails bigger than 35 MB. You can increase the email size limit to 150 MB maximum.
For detailed stepwise instructions, refer to this Microsoft documentation. You may also choose Drive Shipping method where you need to move all PST files into a BitLocker-encrypted hard drive, ship the drive to the Microsoft data center, and pay $2/GB or $2000/1000 GB PST file. Microsoft engineers will upload your PST on your behalf after which, you can start the PST import job to import all the PST files into users’ mailboxes.
Final Thoughts
To avoid the hassle of manual migration, save time, and overcome the limitations of the manual process, use an advanced OST to PST converter tool with an option to directly migrate or export mail items from orphaned OST files to Microsoft 365 or Office 365 mailboxes. It’s the fastest and most efficient way to migrate single or multiple Outlook OST files directly to Microsoft 365 with complete integrity and original folder structure.