Public folders in Microsoft Exchange are a popular, effective, and easy way to collect and share information with other colleagues in a group or organization. There are several scenarios where you want to migrate the public folders to Office 365 (Microsoft 365). For example, if your organization is moving from on-premises Exchange to the cloud-based Office 365, it also wants to move the public folders to provide seamless access to shared information to its employees. Also, some organizations tend to use the public folders as a central repository for shared data. It is easier to access data for remote employees when the public folders are migrated to Office 365. In this article, we’ll be discussing different methods to migrate public folders to Office 365.
Methods to Migrate Public Folders to Office 365
Before migrating public folders to Office 365, there are some requirements that need to be met.
- The Exchange Server is running a supported version of Exchange. For example, Exchange 2016 CU4 or higher.
- Exchange Admin must be a member of the Organization Management role group.
- Public folders can't be larger than 25 GB.
- Migrate user mailboxes before starting the migration of public folders.
- The Exchange Admin Center doesn't support public folder migration. Hence, it can be done only through PowerShell scripts.
- All public folders should be migrated in a single batch.
- The default public folder must be configured at the organization level.
Now, follow the methods below to migrate public folders to Office 365.
Method 1: Use Microsoft's Migration Script
Microsoft offers a bunch of scripts that you can use to migrate public folders to Microsoft 365. Download these scripts and follow the instructions provided to run them. It is to be noted that this is a complex method and requires high level of technical knowledge and expertise in PowerShell scripts.
Method 2: Use Outlook
You can also use the Outlook Import/Export Wizard to export public folders to PST files and then import these files into Office 365.
Step 1: Export Public Folders to PST Files
To convert public folders into PST format, follow these steps:
- Open your Outlook and go to File > Open > Import (in Outlook 2010) and File > Open & Export > Import/Export (in Outlook 2013 and later).
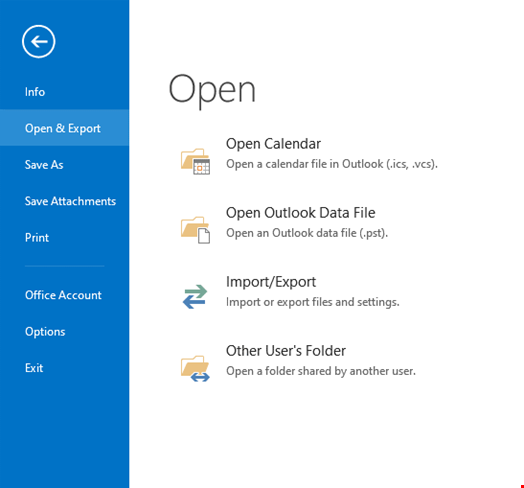
- Select the Export to a File option.
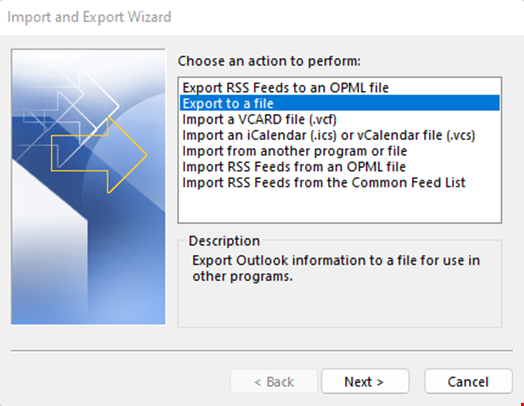
- In the next window, select the PST option.
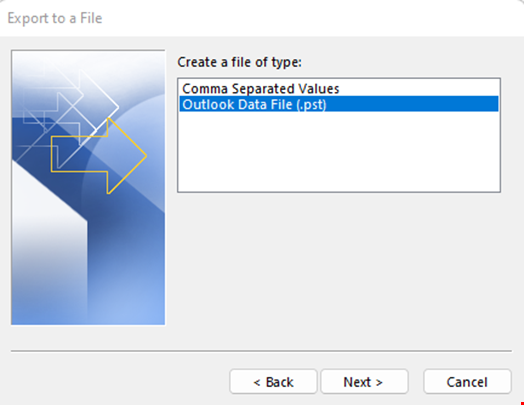
- Next, select Public Folder from the list and check the box to include subfolders.
- Choose a location to save your PST file.
- Click Finish.
The selected public folder will be saved as PST file at your chosen location.
Step 2: Create a Public Folder Mailbox in Exchange Online
Next, you need to create a public folder mailbox in Exchange Online using either the Exchange Admin Center or PowerShell. This mailbox will hold the public folders migrated from the on-premises Exchange environment.
Step 3: Import the PST File into Microsoft 365
The final step is to import the PST file containing the public folder content into Exchange Online. You can do this by using the New-MailboxImportRequest cmdlet in PowerShell or through the Exchange Admin Center (EAC).
However, the above method is complex and time-consuming, and requires technical expertise. Also, Microsoft doesn't recommend using PST method due to the following reasons:
- Typically, large files are split automatically during the migration process. This could result in data loss.
- It can take two weeks for the data migration process. Users can't access the data during this period.
- The PST file may get corrupted if the file size exceeds 25 GB.
- You can migrate all the public folders as a single batch only.
Method 3: Use an EDB Converter Software
To overcome the limitations of manual methods, you can use an EDB to PST converter software, such as Stellar Converter for EDB. The software can convert the Exchange Database (EDB) files into PST format for easy migration. It can help organizations migrate their public folders from on-premises Exchange to Microsoft 365 with ease. This tool is also easy-to-use and can significantly reduce the time and efforts required for migrating public folders to Office 365.
Advantages
Some of the advantages of using this tool are:
- Exports public folders to PST.
- Exports public folders directly to Microsoft 365 and live Exchange Server.
- Migrates single as well as multiple public folders.
- Supports parallel processing of mailboxes and public folders for faster processing.
- No advanced technical knowledge is required.
- Enables you to extract data from old and offline EDB files as well.
- Enables you to prioritize the conversion process.
- Offers a preview before the conversion process.
Bottom Line
Migrating public folders to Microsoft 365 can help organizations streamline their collaboration and information-sharing processes. However, the manual migration methods can be complex and time-consuming, and can even result in permanent data loss or corruption. Using software, like Stellar Converter for EDB, can help organizations migrate their public folders to Microsoft 365 with ease.