There are numerous reasons why you need to import an OST file into an Outlook account or profile. In this article, you will learn the ways with step-by-step instructions to import OST file into Outlook with complete integrity and precision.
Outlook stores all the mail items in an Offline Storage Table (OST), also known as an Offline Folders file, when you sign in using an Exchange, Microsoft 365 (Office 365), or IMAP email account. OST file allows users to work offline. Any changes made, when offline, are synchronized with the mailbox server once the connection is restored.
Unfortunately, Microsoft Outlook does not support the OST import function natively. As a result, you cannot import an OST file directly into Outlook. In this article, you will learn the step-by-step process to import an OST file into Outlook.
Reasons to Import OST File into Outlook
There could be several reasons why you may want to import an OST file into Outlook. Some common ones are:
1. Can’t Open Outlook or Access emails
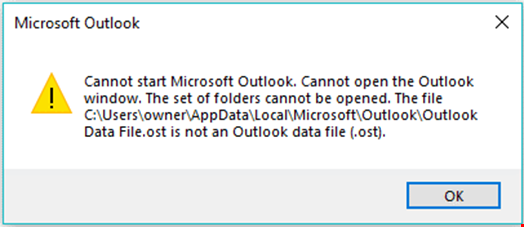
When the user can’t access their emails in Outlook or receives errors, such as xxx.OST is not an Outlook data file or cannot open Outlook, it means there is something wrong with the Outlook account or the OST file.
2. Restore Mail Items from an Orphaned and Inaccessible OST File
An OST file becomes orphaned or inaccessible when the email account (in which it is created) is either disabled or deleted from the mailbox server.
3. Restore Mail Items from a Backup OST File
Sometimes, users create a backup of OST files. To access backup OST data, they need to import the OST file into their current or another Outlook account or profile.
4. Mailbox Migration
You want to migrate data from your Outlook profile to another profile.
Process to Import an OST File into Outlook
Here’s the stepwise process to import OST file into Outlook.
Step 1: Convert the OST File to PST
You cannot import an OST file directly into Outlook. Therefore, you must convert it into Outlook importable PST format. For this, you can use any of the following methods based on your scenario.
Method 1: Use Outlook Import Export Wizard
You can use this method when you have access to your Outlook account. The steps are as follows:
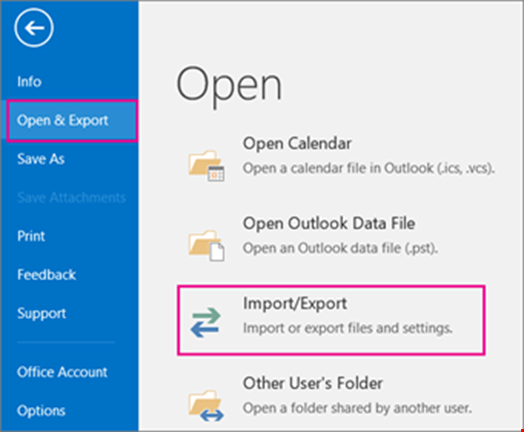
- Open Microsoft Outlook and select File from the top menu bar.
- Select Open & Export from the dropdown menu.
- From the window that opens, click on Import/Export.
- Click on Export to a file and then Next.
- Choose Outlook Data File (*.pst) from the list of export options and click Next.
- Find and select the folders you want to convert and click Next.
- Choose a location where you want to save the PST file and click Finish.
Method 2: Use an OST to PST Converter Tool
If the OST file is not accessible or becomes orphaned, you can use an OST to PST converter tool, such as Stellar Converter for OST. You can also use the software to convert any backup OST file that you have. The software allows you to convert OST files created by any Outlook version into PST format with complete integrity. You can also save the mail items to other formats, such as MSG, EML, RTF, PDF, and HTML.
You can also use the software to directly import the OST file into an existing Outlook profile, Outlook 365 (Microsoft 365), or live Exchange Server mailbox in a few clicks. The software preserves the original structure of the OST file and can convert encrypted OST files as well.
Step 2: Import the PST File into Outlook
After converting the OST file to a PST file using any of the above methods, you can import this converted PST file into Outlook. Here’s how:
- Open Outlook, go to File > Info > Open & Export and click Import/Export.
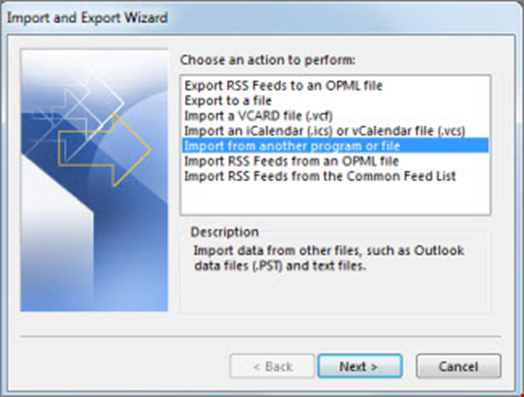
- From the options, choose Import from another program or file and click Next.
- Select the Outlook Data File (.pst) option and then click Next.
- Click Browse and then select the converted PST file. Make sure to choose the relevant option, such as Replace duplicates with items imported, and then click Next.

- Select all the mail items and choose the email account, such as Microsoft 365 or Exchange, from the dropdown where you want to import the mail items. Then, click Finish.
- Outlook will start the import process and import all the contents from the converted PST file into your Outlook profile.
This may take a while to complete, depending on your system specifications and converted PST file size.
Conclusion
Importing an OST file into Outlook requires converting it to a PST file. This can be done manually or using an advanced OST to PST converter software, such as Stellar Converter for OST, as discussed in this article. The software simplifies this process and allows conversion of even inaccessible or orphaned OST file. The software supports large OST files of up to 50 GB or more. It saves the OST data to Outlook importable PST file with complete precision and integrity. It can also directly export mail items from an OST file to an existing Outlook profile, Microsoft 365 mailbox, or Exchange Server.