Migrating large mailboxes – especially more than 100GB in size - can be a little bit complicated. While most mailboxes are average in size, large mailboxes are common among executives and legal teams. These large mailboxes significantly increase complexity of migration and raise the chances of issues like timeouts, throttling, data corruption, incomplete transfer, and data inconsistency.
Based on testing and multiple migration scenarios, we have, in this guide, outlined the most effective ways for migrating oversized mailboxes from local Exchange Server to Microsoft 365. We have also mentioned a third-party Exchange migration tool that helps overcome the limitations associated with the native solutions.
Why does Migration of Large Mailboxes Fail?
Before moving on to the migration approaches, let’s have a look at the reasons of migration failures when dealing with large mailboxes.
Throttling Policies
- As a protection mechanism, Microsoft 365 applies throttling policies to protect the services. During transfer of large amounts of data, these policies may slow down the migration and sometimes, halt the entire migration.
Connection Timeouts
- When transferring large amounts of data, there can be timeouts due to various factors. Some of the factors include bandwidth limitations, network capabilities, server performance, and throttling.
Size Limitations
- Microsoft 365 subscription plans come with some limitations and quotas. For instance, the Business Basic and Business Standard plans have a limit of 50GB for the mailboxes. If you have mailboxes over 100GB, you should consider the Business Premium or Enterprise E3 plan. These plans include online archive options to ensure that the migration task is not halted if the mailbox is full.
Corrupted Mailbox Items
- Although you would have a working Exchange Server, older and large mailboxes in the Exchange Server may have corrupt items accumulated over the time. These can interrupt the batch migrations or even halt the migration.
Recommended Approaches to Migrate Large Mailboxes to Microsoft 365
You can follow the below-given approaches for migrating large mailboxes (over 100GB in size) from an on-premises Exchange Server to Office 365. These approaches are applicable for organizations hosting Exchange Server 2016, 2019, and Subscription Edition (SE).
Note: We are taking into consideration the infrastructure of a local Exchange Server with a hybrid connection to Microsoft 365.
Approach 1: Using Native Exchange Tools with Optimization
You can use the native Exchange tools for Exchange to Microsoft 365 migration. Follow the steps below:
Step 1 – Enable Online Archive Mailbox
Exchange Online supports Online Archive Mailboxes. For mailboxes over 100GB, you will need to provision Microsoft Enterprise E3 license as it supports auto-expanding online archive mailboxes. If the Exchange Online module is not installed, you can use the command below:
Install-Module -Name ExchangeOnlineManagement

After this, you can use the command below to connect to the Exchange Online.
Connect-ExchangeOnline -UserPrincipalName admin@yourdomain.onmicrosoft.com

After a successful connection, enable the archive mailbox by using the below command.
Enable-Mailbox -Identity user@domain.com -Archive

To enable the auto-expanding archive, use the command below.
Set-Mailbox -Identity user@domain.com -AutoExpandingArchive

This command will remove the 100GB limit and allows unlimited archive.
Step 2 – Migrate Data in Stages
You should not migrate the entire mailbox at once. If the mailbox is full, it will stop the migration. You would need to manually archive. A massive job to reconcile and reduce the chances of missing or duplicate data.
For this reason, you should split the migration of each mailbox where a migration batch will migrate the last year to the primary mailbox, while the second batch will migrate the rest to the online archive mailbox.
Here is an example of the migration batch.
$StartDate = (Get-Date).AddYears(-1)
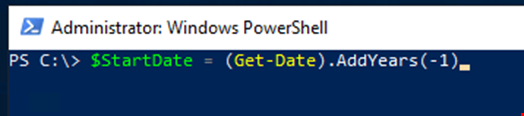
In the above command, the $StartDate is the year from which the migration will start.
The command below will create a migration batch. This will read from the CSV file the list of users to migrate and use the specified date in the $StartDate to migrate the data.
New-MigrationBatch -Name "<bath name>" -SourceEndpoint "<endpoint>" -CSVData ([System.IO.File]::ReadAllBytes("C:\Migration\migrationusers.csv")) -StartAfter $StartDate -TargetDeliveryDomain "yourdomain.mail.onmicrosoft.com"

An example of the CSV file is:
EmailAddress
user1@yourdomain.com
user2@yourdomain.com
user3@yourdomain.com
With this approach, you can migrate the data with a peace of mind and with reduced chances of interruptions and errors.
Step 3 – Increasing the Move Request Size Limit
You should also modify the migration endpoint for large items. This can be done by using the command below.
Set-MigrationEndpoint -Identity "<endpoint name>" -MaxConcurrentMigrations 10 -MaxConcurrentIncrementalSyncs 20

Step 4 – Work Around for Throttling
Microsoft has throttling policies to protect the services. You cannot disable them for obvious reasons. You can request Microsoft to bypass the throttling policies during the migration but it can take some time, delaying the process. So, you can find other ways for faster migration.
A practical approach is to migrate the data during off-peak hours (00:00 to 06:00) and during weekends. In testing environments, it is found that throttling events are significantly reduced during such periods.
Approach 2 – Using Third-Party Specialized Exchange Migration Tools
Third-party Exchange migration tools can simplify the migration of large mailboxes and reduce the challenges associated with the native Exchange migration tools. One such tool you can rely upon is Stellar Migrator for Exchange. This tool operates independently of the Exchange Server – whether you have a standalone or hybrid setup. It allows easy migration of data with minimal effort with real-time reporting and post-migration reports. This ensure that the data has been migrated with no issues.
In comparison to the native tools, Stellar Migrator for Exchange offers the following advantages:
- Eliminates the need to manually split the data.
- No need to use complex scripts, thus reducing human errors.
- Avoid PST file-based migration methods, which are not ideal for large mailboxes.
- Allows to granularity export the items.
- Automatically handles issues with the items.
- Supports migration of data using delta (incremental) migration method, which is throttling friendly.
- Supports migration of mailboxes, shared mailboxes, and public folders.
- Offers automatic mailbox matching.
The tool is compatible with every version of Exchange Server and supports the following migration paths:
- Exchange Server to Office 365.
- Exchange Server to Exchange Server.
- Office 365 to Office 365 (tenant to tenant migration).
- Office 365 to Exchange Server (reverse migration).
With this tool, you can migrate data with ease and minimal steps via a very intuitive interface, thus reducing the complexity of the migration process.
Conclusion
For migrating large mailboxes (of more than 100GB size) to Microsoft 365, you need to split the data into online archive and enable the features such as auto-expanding archive to ensure that the migration is smooth and without any interruption. You need to make sure the environment is healthy and in line with the limitations and constraints of Microsoft 365. Using Stellar Migrator for Exchange, you can reduce such complexities and migration nightmares.